DIY Nitrous kit

Here are the bare minimum pieces that you will need to make your own nitrous system. One thing to keep in mind, this is not a list of parts that allow you to build the system from raw components.
if you are interested in that, I suggest you check out John Williamson's page.
Parts list for a DRY system:
- 1 - Nitrous bottle with pressure gauge(gauge is optional)
- 1 - 10-16ft Feed line
- 1 - Nitrous solinoid
- 1 - 1-2ft feed line
- 1 - Nitrous nozzle
- 1 - Nitrous jet(you select the HP rating, or use my calculator)
- 1 - WOT switch (Wide open throttle) (push on/release off)
- 1 - Activation switch (push on/release off) (Go Baby go!)
- 1 - System Arming switch(push on/push off)(to turn the whole system on/off)
- 1 - set of wire and connectors/electrical tape.
- 1 - Teflon paste. Do not use the tape!
What you need to add for a WET system:
- 1 - "T" fitting for fuel line
- 1 - Fuel solenoid
- 1 - 1-2ft feed line
- 1 - Nitrous Fogger nozzle
- 1 - Fuel jet(you select the rating, use my calculators)
- 1 - Just a little more wire
Extra stuff that just makes things neater:
- 1 - Nitrous Solenoid for purge system
- 1 - Air-Fuel gauge
- 1 - Button to actuvate purge solenoid
- 1 - Purge nozzle
- 1 - Nitrous monitoring system-Expensive but cool
- 1 - Just a little more wire
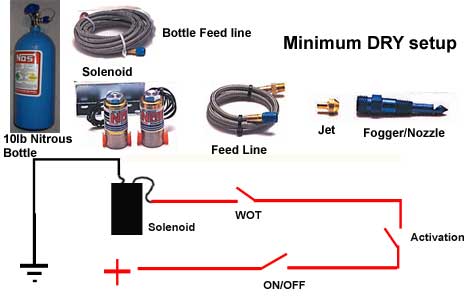
The first thing you will need is a bottle. I would suggest a 10lb(pound) capacity bottle with a pressure gauge attached to the valve assembly. Now you can get a separate gauge that goes to a pillar mount, but you will be spending a little more for that, because you will need an extra 'T' fitting and a couple more pieces of feed line to attach it all together. The other thing to remember is that you only see what the pressure is AFTER you open the nitrous bottle, whereas the one attached to the bottle displays the pressure all of the time.
Bottle Feed line- depending on where you mount the Nitrous bottle, you will need 1 - 10-16ft feed line. This line will run from the bottle to the nitrous solinoid.
Nitrous Solenoid- pretty abundant-this is the second most expensive part you will buy next to the bottle.
Nitrous nozzle and Jet- This nozzle needs to be the DRY type- it will have only one fitting on it. The wet Fogger nozzles have two, one for the nitrous, and one for the fuel.
The Jet will fit in between the feed line and the nozzle-this will restrict the amount of nitrous being fed to the engine.
Switches and Wire- There are 3 switches in my setup: a WOT(wide open throttle) switch, an activation switch, and an arming switch.
the WOT switch is mounted by the throttle body-this takes a little bit of time to fashion the mounting bracket and adjust it just right.
the Arming/System switch turns the system "on"
the Activation switch is the button that you push to activate everything--the magic button if you will.
When wiring the switches together, you will want then all wired in SERIES with each other. This means that all of the switches have to be in the ON position to activate the solenoid:
Disclaimer- I am not responsible for anything! This is for informational use only, blah blah blah.
Some states have restrictions about using nitrous oxide. Consider removing nitrous equipment before using any car shipping service to transport your car across the country.
| 

